How to Balance Your Monitor Arm
Posted by Human Solution on Apr 28th 2014
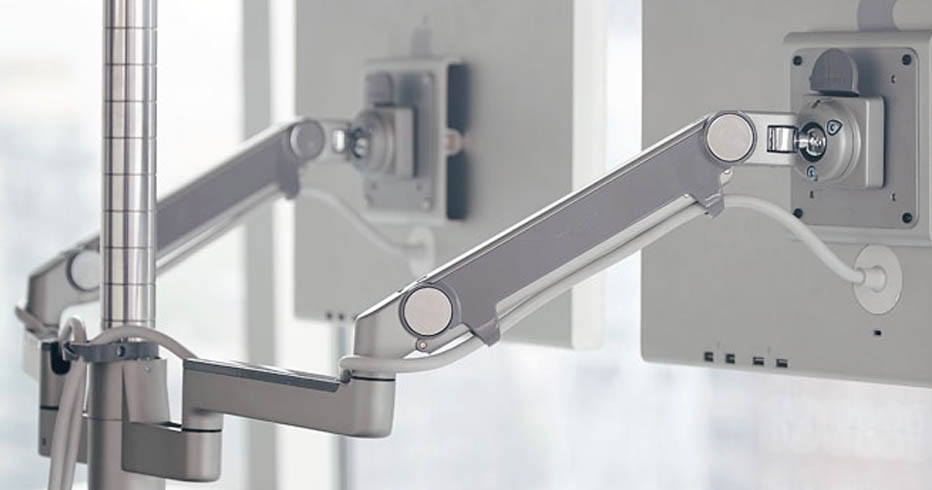
When it comes to monitor arms, “fingertip-adjustable” models like the UPLIFT Monitor Arm, Humanscale M2 and Innovative EVO II are hands-down some of the best options on the market. In addition to looking extra-sharp, thanks to a refined, knob-free design and integral wire management, these arms offer a counterbalance mechanism that allows you to “float” the display where you need it, then move it by simply grabbing the monitor and pushing or pulling it to where it needs to be. Compared to older models, which required loosening a set screw to adjust the height, these monitor arms are significantly easier to use. Of course, not all monitors are the same, so these arms require a bit of setup work with the counterbalance system. With just a couple of simple adjustments, you will ensure that your arm is easy to move and able to provide sturdy support in whatever position you find comfortable.
Adjusting your arm’s counterbalance is as easy as using the arm itself. While most fingertip-adjustable monitor arms will include their own set of specific instructions, the most common arms in need of adjustment are Innovative’s 7000/EVO II series and Humanscale’s M2/M8 monitor arms. With a hex wrench and a few minutes, you can tweak the counterbalance tension of these arms so that they perfectly float your monitor wherever you leave it. Here's a simple guide on how to balance your monitor arm:
UPLIFT Single and Dual Monitor Arms:
The most popular monitor arms we sell, hands-down are the UPLIFT Monitor Arms. They’re available in both a single mount option and a dual mount option. Both clamp the edge of your desk with a clamp mount and they both adjust in very similar ways. The counterbalance tension can be adjusted with the hex keys that come included in the hardware. Each segment of the arm has a screw on the front for adjusting the side to side motion and the main segment (the largest one that attaches to the base) has a large screw on top with a +/- next to it. The first thing to do is to attach your monitor to the arm. Counterbalancing is pointless without it. Once you have the monitor on there, you want to tighten the large screw on the base. To make it easier on yourself, turn the screw all the way to one side and then after that, all the way to the other. When turned all the way to one side your arm will not be able to hold the monitor up and at the other end, it won’t stay down. Your goal is to manipulate the screw until the monitor stays in place without slowly dropping or rising. This may take a few minutes but once you get the baseline for how turning the screw one way or the other affects the arm, it becomes much easier. Once that part is adjusted, check the arm to see if it drifts to the left or right at all. If not you’re good to go to the last step. If so, figure out with segment is actually drifting and tighten the small hex screw on the front of the segment until the arms stops drifting. Finally, if the tilter is drooping, you need only tighten the bolt on the tilter with a wrench. It’s literally the only screw that isn’t a hex screw on these. The dual arms have this part exposed but the single ones have it under a cap. If you remove the cap, you can actually tighten the bolt with pliers. Once done, the screen should stay where you move it.
Innovative 7000/EVO II Series Monitor Arms:
For Innovative’s popular 7000 and EVO II series monitor arms (as well as their derivatives such as the 7500 and iLift series), counterbalance tension adjustment can be done by taking the appropriate hex wrench and tightening or loosening the hex screw placed just about the arm base. First, you’ll need to attach your monitor to the arm by mounting the VESA plate to the back of the display, then attaching the plate to the arm assembly. Once the monitor is installed, you’ll either notice that the arm is now drooping under the monitor’s weight, or popping up because the tension is too high. The easiest way to adjust the tension to a “neutral” position is to press the forward end of the arm down with one hand so that the hex wrench can clear it, then adjusting the screw with the other. Turn the hex wrench counter-clockwise to increase tension for larger displays, or clockwise for lighter displays. It may take a fair bit of adjustment to find the perfect amount of tension, but once the resistance is properly set, you should be able to move the monitor around by pulling or pushing the display itself, and it should stay in place once released.
Humanscale M8 Monitor Arms:
Like the Innovative 7000 and EVO II series arms, the Humanscale M8 arm is adjusted by using a hex wrench to tighten or loosen a single hex screw. The M8′s tension screw is located under a plastic flap on the top of the “dynamic” portion of the arm. Unlike Innovative’s arms, however, you’ll need to turn the wrench clockwise to increase tension, and counter-clockwise to decrease tension. Like the Innovative arms, the counterbalance is properly set when the monitor moves smoothly, and can be released to “float” in place.
Humanscale M2 Monitor Arms:
The Humanscale M2 monitor arm operates on the same general concept as its larger cousin and Innovative’s monitor arm offerings, but requires slightly more work to set up. To adjust tension for the Humanscale M2, you’ll need to use the included 4mm hex key to loosen the two side screws located inside of two “discs” on the dynamic arm. Once these screws are loosened, use a 3mm hex key (also included with the arm) to loosen the two set screws on top of the arm, near the side screws. With all four screws loosened, tighten down the side screws until the arm moves freely and supports the monitor when released. Firmly tighten the top set screws again to set the tension adjustment.
Of course, while these tips will help you zero in on the perfect adjustment for our most popular monitor arms, not all monitor arm styles will adjust in the same way. If your mounting system still doesn’t want to stay put, be sure to refer to your monitor arm’s instruction manual to ensure that you’re adjusting everything correctly. Many arms will also have additional “fine tuning” adjustments that can be made as well should these tweaks not provide optimal results. It might take a little bit of effort, but having a properly balanced monitor arm can make the difference between easily adjusted, eyestrain-free bliss and long hours of monitor-induced frustration.
Learn more about fingertip-adjustable monitor arms at TheHumanSolution.com.
Follow Us:


Interested in ergonomics?
Subscribe to our blog mailing list